2010 Acura RDX 'B13' Service
This post got a little long, sorry.
I have always been extremely appreciative of folks who have taken time to write or record the steps they took to do different services or maintenance on their vehicles. Their contributions have helped me become somewhat of a "shade tree mechanic" and has saved our family who knows how many $$$'s. So, when Briana's maintenance minder popped up with the next routine maintenance, I figured I would try to return the favor a little bit. I am sure that will not at all live up to some of the spectacular DIY guides I have found on forums across the internet, but perhaps this will help someone. The one I used most heavily for this maintenance was here: http://acurazine.com/forums/1g-rdx-diy-faq-161/diy-transmission-fluid-flush-3x-drain-fill-794451/
I should preface this with the fact that I use the Auto Hobby Shop on base to do most of my maintenance on the cars for a few simple facts:
- They have way more tools than I do, so if I forget a took or need something really specific, I don't have to find a way to the auto parts store to buy that tool.
- Using hydraulic lifts makes the job WAY easier and it’s a lot of fun to work like a real mechanic.
- I can dispose of oil and other chemicals right there, I don't have to take my sloshing oil pan to the parts store to dispose of it.
- The guys that work there and also patronize the establishment are a wealth of knowledge and can help you out before you do something silly (like try to replace a wheel bearing an hour before they close).
- Finally, let's be honest, who doesn't love acting like as NASCAR pit crew when you go to rotate the tires using a pneumatic impact wrench?
That being said, you could do all of this in your garage with minimal tools, except the tire rotation. For the fluid changes, you could drive the vehicle up on 1 or 2 2x4s so that you can get under the vehicle easier. To do the tire rotation at home, you would need at least a hydraulic jack (large truck jack for an SUV) and 4 jack stands.
SAFETY: Always ensure that your vehicle is secured both from rolling and from falling if you are using a jack or lift. Use safety equipment as necessary including gloves and eye protection.
Acura B13 service requires:
- Oil and oil filter change.
- Transmission fluid flush
- Front transfer case oil change
- Tire rotation
- Routine checks for brake and belt wear, axle boots, fuel and brake lines, exhaust, and a general inspection for any issues.
Out of these, I had only done the oil/filter change and tire rotation before. I had done a rear differential change, which turned out to be pretty similar to the front transfer case.
Oil and Filter Change
This is the most routine job, probably the easiest, and perhaps the messiest. Required tools/parts:
- 5 quarts of oil. I always use the Aucra/Honda recommended Mobil 1 5W-30 that meets the Honda HTO-06 oil specification.
- Oil filter. I generally use a Bosch Premium filter but if there is a good sale going on for a filter/oil package with the Mobile 1, I may go with that filter. In this case, they were out of the deal filter so gave me the Bosch one for the same price (score!)
- Crush washer
- Ratchet set
- Funnel
I always start my oil change my loosening the oil fill cap on the top of the engine. This prevents the oil from doing the "glub, glub" thing that happens when you try to pour out a bottle and therefore making the job a bit cleaner. Leave the cap in place though as you don't want anything to accidentally fall into your oil reservoir.
Then I get under the vehicle and position my oil pan just below the oil drain plug (pointed out by the red arrow below). Keep in mind that almost 5 quarts of oil are going to come out so there will be some force behind it coming out through the small drain hole. I usually position on edge of the oil pan just below the drain plug and the remainder of the oil pan out from the drain plug to catch and large initial flow of oil.
Next you loosen and remove the drain plug. Depending on how much room you have under the vehicle, you may have to get the bolt loosened first and then position your oil pan. To loosen the bolt, just find the correct socket size and use a fair amount of force to just get the bolt loose (do not fully remove yet). If the bolt simply will not budge, make sure you have the right socket size (and are turning the correct direction...made that mistake before) and then give your ratchet a few solid blows with a rubber mallet and the bold should begin to turn. Once the bolt is loose enough to turn with your fingers, position and/or check your oil pan placement and unscrew the bolt the rest of the way. The oil will start to drip out just before the bolt comes all the way out. The oil will be HOT if you have driven recently so be sure to get your hand out of the way of the oil flow. Let the bolt drop into the oil pan if you have the oil pan style that either has a grate or a small hole for the oil that the bolt cannot go into.
I usually let the oil drain until is just starts dribbling out of the drain hole. This may be overkill but I like to be thorough. A total engine flush is not necessary if you keep up on your regular oil changes. Once the oil has all drained, replace the drain plug with a new crush washer and make sure it is tight (if your drain plug looks pretty worn or is starting to get stripped, get a new one of those as well). I give it a few taps with the mallet. The plug does NOT need to be cranked down until no movement is left, just until you see the washer start to crush. If you are really thorough, you can probably find the specific torque spec. Wipe off the bottom of the oil pan and you are done with this part.
If you have enough room, you can move onto changing the filter while the oil drains, otherwise, just wait and do this step after you have drained all the oil. I have found that filter wrenches are hard to use and generally do not fit smaller filters so I always use a set of filter pliers to get the filter out. Use the pliers to loosen the filter until you can turn it with your hand. Once the seal is broken, oil is going to spill out over the filter. If your filter sits upright like the Acura, just make sure your oil pan is positioned appropriately. If your oil filter sits sideways or above some of the plastic shielding (like in my Kia) you have a couple options: 1) Make a mess and just go for it (YOLO!), 2) put some oil rags up there to soak up the oil, or 3) use some tin foil to try to redirect the oil to your oil pan. Continue to unscrew the filter until the seal is broken and the oil runs out. Then finish removing the filter keeping in mind that it is still full of old oil. Clean up the area and get ready to install the new filter. With the new filter, fill it up with some of your new oil and use your finger to coat the filter gasket with oil. These two things will prevent a moment of no oil going to your engine while the filter fills up on the first run and will prevent the gasket from drying out and/or getting stuck when you do your next filter change. Install the new filter and only hand tighten it. You should use a little force to tighten the filter but it does not need to be fully tightened down and certainly do not use a tool for this part.
Next, fill your engine with the required amount of oil through the fill cap on top of the engine using a funnel and you are done (I waiting until after I did the other portions of the service so I didn't have to take the vehicle up and down a bunch of times). If you do not know how much oil to use, add oil a bit at a time continuing the check the oil dipstick. If you use this method, make sure you run the engine when you think it is full and then check again as the filter may absorb some additional oil.
Whew! done with that part.
Transfer Case Oil Change
This one was the fastest and easiest part. Required tools/parts:
- a ratchet
- a mallet
- a hand pump
- the required gear oil (I used 80W-90 Mobil 1 with the API GL-5 rating, that rating is the important part)
From the picture below, you can see the transfer case just a little behind the oil filter and attached to the transmission. The yellow arrow points to the fill hole and the red arrow is the drain hole. The first step is to remove the drain hole and drain the gear oil out of the transfer case. You could probably remove the fill hole first to prevent the "glub, glub" again, but you may also drain a bit of oil out the fill hole so just be ready to catch it and clean that little bit up. There will not be very much oil in here, just about .5 quart. Once the oil has completely drained (to a dribble) replace the drain plug and remove the fill plug if you have not done so already. As with the oil plug, make sure the plug is tight but you do not need to go for a max effort bolt tighten.
Attach the hand pump to your gear oil jug and place the tube in the fill hole. You want to fill just until you can touch oil through the hole with your finger. Or more realistically, just until oil starts to dribble out of the fill hole. Once you have filled it this much, replace the fill hole plug tightly, clean up any mess you made, and you are done!
Easy peasy.
Transmission Oil Change
This one is pretty straightforward but just takes a long time due to the setup of the transmission in the engine bay. The picture below shows the drain plug for the transmission and we will be filling the transmission through the dipstick (more on that later). This oil change will require us to repeat the steps 3 times to ensure that we get as much of the spent transmission fluid out and replaced with fresh fluid due to the fact that much of the transmission fluid does not sit in the transmission itself. Required tools/parts:
- One case of transmission fluid (approx. 12 quarts). The new spec is Honda ATF DW-1 (used to be Z1).
- Oil pan or contained large enough to hold 12 quarts of fluid
- Ratchet set
- A tiny little funnel plus a large/long funnel, or a regular funnel with a tiny little hose attached (see picture at the bottom of this section)
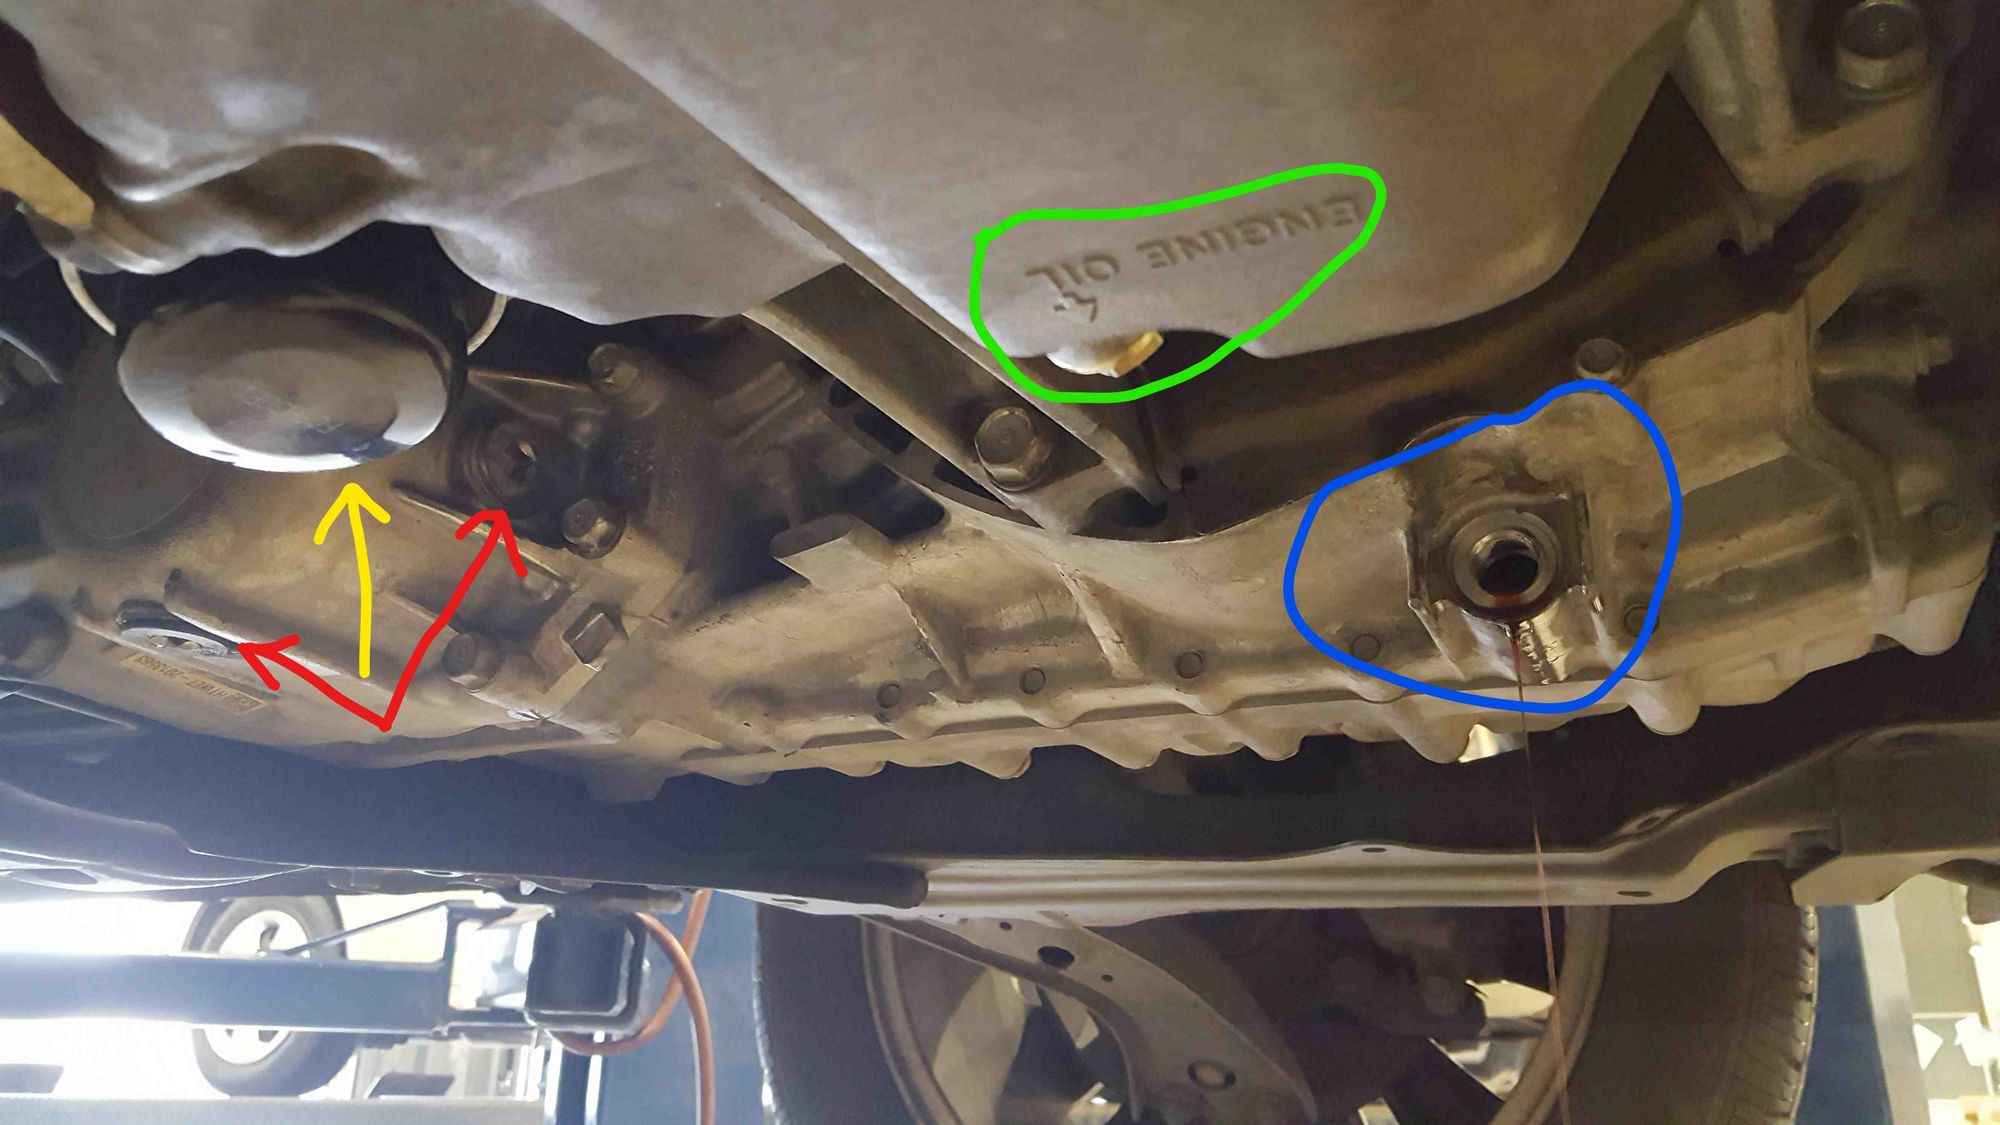
First step is to drain the initial contents of the transmission through the drain point pictured below and circled in blue (other colors shown for reference).
Removing the drain plug will be very similar to the oil and transfer case drain plugs. The only difference is that this plug is a bit longer and has a magnetic tip. This magnetic tip catches all the tiny metal shavings that accumulate in an engine naturally over time. Once you remove this plug, while the transmission fluid is draining, clean off any of that metal sludge. Once the drain is complete replace the plug and move to the top of your vehicle.
We are going to do the first refill of the transmission oil. You have two options here. You can remove the air box in order to get to the actual fill hole for the transmission. This will make filling the transmission much quicker, but you have to remove the air box. The other option is to fill the tranny through the dipstick hole. This just requires a tiny little funnel and a larger funnel in order to fit in that tiny dipstick hole. This also means you will be pouring almost 12 quarts of transmission fluid extremely slowly over the course of the service. Once you have your funnel situation figured out, we are going to put 3.1 quarts back in the transmission. If you were able to capture the spend fluid in a container, you can use that to gauge exactly how much fluid to put back in. Once complete, replace the dipstick.
Because we cannot get all the transmission fluid at once, we need to get this new fluid circulated in the system before doing another flush. Make sure you have completed all other work (i.e. refilled your oil) and take your car out for a spin, making sure you get up to full speed and hit all the gears. This will circulate the fluid and also allow any remaining metal shavings to cling to the magnetic drain plug. You want the car to warm up but not to be at full operating temperature if you can help. Once you return, repeat the steps above two more times (total of three flushes). This is fairly time consuming but will do wonders for your transmission.
Finish your fluid changes by parking somewhere that you will notice any leaks that may pop up. If something starts to leak, tighten it down a bit more if possible. If tightening the plug does not stop the leak it means you probably did not use a new washer and you will have to do that job again with one.
Tire Rotation
If you are doing a tire rotation as well, get the car jacked up and secured using your jack and jack stands or a hydraulic lift if you have one available.
Start by using the impact wrench to remove the lug nuts from each wheel using a star pattern to prevent any chance of warping your wheel or the hub. Leave the wheels in place for now. Once all lug nuts are removed move the wheel to their new locations. The best rotation patter is to move both rear wheels directly forward and bring the front wheels to the rear AND to the opposite side (you can reverse this too; fronts go directly back and rears cross forward, just be consistent). If you always use this pattern, your tires will last much longer as they are in a constant rotation from front to back and side to side. Now go to each wheel and mount it by finger tightening one lug not and each lowest lug. Once you have done this for all four wheels, go back to each one with your impact wrench, tighten the one lug nut that is in place and then the remaining lug nuts, again using a star pattern.
Once all wheels are back in place and all lug nuts are tightened down, lower your vehicle back down to the ground. Finish the job by going back to each lug nut with a torque wrench and ensure that they are torqued to the proper spec for your vehicle and wheels. For most alloy wheels, this is around 100 ft-lbs.
That's it. Job's done.
Car Work
Of course, this stuff is always easier said than done. If you are unfamiliar with doing this sort of work, always consult a trained mechanic, your buddy who works on cars, or just a good YouTube video 😉.
The things that have caused me the most trouble with car work are;
- Not having the correct tool for the job. You are saving money by doing your own work, use that savings to just get the right tool.
- Cars are mostly built by
power hungryrobotsbent on world dominationthat probably over tightened a lot of things and these things have been pretty much untouched for probably a few years (if this is your first time doing this maintenance). This means that bolts are going to be hard to budge sometimes. Just be sure to use the right size tools to prevent stripping any bolts. - A rubber mallet (or as my friend John calls it, "The Convincer") is an indispensable tool.
- Having someone to help you can go a long way, especially for more involved jobs. Embrace the manly art of pretending the fix things while drinking beer and get a buddy to help. Maybe you can each teach each other something about cars.
- Lastly, if you are working on your wife's car, be damn sure you get the job done in the time-frame you originally told her (always over-estimate).
Cars are not as fragile as folks make them out to be. Most of the time, if you do something wrong, you just redo the job or put the part back that you took off. That being said, make sure to weigh the pros/cons. If you are only going to save $100 by tackling a job way outside your comfort zone, consider taking it to the mechanic.
I will say though, having a working knowledge of vehicles goes a long way towards driving your car in a fashion that promotes longevity, having an intelligent conversation with your mechanic (and not getting jerked around), and ensuring that your many thousand-dollar investment continues to serve you well.